Move from Render to your own cloud

Step-by-step guide to migrating your Render web service to your own AWS account. No DevOps hire, no Terraform.
If you're here, you've already decided to move. Maybe you're chasing an enterprise deal that requires your data to live in an account you control. Maybe Render's compute markup has started to show up in conversations about the cloud bill. Maybe you just noticed that the platform you chose for its simplicity is starting to look a lot like every other managed runtime that eventually got expensive and inflexible.
Whatever the trigger — this guide gets you from Render to your own cloud account without handing deployment to a DevOps hire.
A note on what "move off Render" actually means: most guides in this space end up recommending Coolify on a VPS or DigitalOcean Droplets. That's one path, but it trades one management burden for another — now you're maintaining a server. This guide is for something different: your app running in your own AWS account, on AWS compute you pay for directly, with no server to maintain. The ops layer is Leanly's problem, not yours.
If you're still weighing the decision, see how Leanly compares to Render first.
Why teams make this move
- Pricing that scales against you. Render marks up compute — you pay Render's rate, not your cloud provider's. At low usage the gap is easy to ignore. As your app grows, the difference compounds. With Leanly, the compute bill goes directly to your cloud account at cost — we charge separately only for the orchestration layer.
- Compliance posture. "Where does your data live?" "On Render's servers." That answer closes doors with enterprise buyers, healthcare customers, and anyone subject to data-residency requirements. "In our own AWS account, in our own VPC" opens them.
- A shorter dependency chain. Render runs your workload on their infrastructure, which sits on top of a third-party cloud. That's two execution layers, two sets of failure modes, two SLAs multiplied together. With Leanly, your app runs directly in your own cloud account. We sit in the orchestration layer only and are never in the path of a live request — so we don't add to your SLA chain. When something does go wrong, you're looking at one console with real logs and alarms, and we're there to help you work through it.
What you'll end up with
After this migration, your app runs in your AWS account. The exact resources depend on what we recommend for your app — Render web services are containerised, so ECS on Fargate is the most common outcome, but we may suggest something better suited to your workload's scaling or cost profile. For ECS, you end up with:
- ECS service — your container, running on Fargate (no cluster to manage)
- Application Load Balancer — public HTTPS endpoint, TLS handled
- ECR repository — your container images
- Security groups and IAM roles — provisioned with sensible defaults; all visible in your AWS console
Whatever we recommend, you own all of it. We provisioned it; you can inspect it, extend it, or hand it to another tool later.
This guide covers stateless web services — Node.js, Python, Go, or similar. If your app connects to a database, bring the connection string as an environment variable. We don't provision databases yet — connect an existing managed database in your AWS account or elsewhere.
Before you start
You'll need a Leanly account with your AWS account and GitHub connected. If you're new to Leanly, sign up here, install the CLI (npm install leanly --global), and connect your accounts — about 5 minutes.
For this guide: your Render app needs to be in a GitHub repo, and have your environment variables ready to export (step 1 covers this).
The steps
Step 1 — Export your Render environment variables
Before touching Leanly, get your env vars out of Render. In the Render dashboard, go to your service → Environment → Export as .env file.
Audit the list for Render-internal references. Render's managed databases inject connection strings automatically — if you're on a Render Postgres instance, that connection string is meaningless outside Render. Set up an external database (AWS RDS, Supabase, Neon, or similar) and replace it with a real connection string before continuing.
Step 2 — Run leanly init
In your repo:
leanly init
This opens the Leanly UI in your browser.
Step 3 — Watch us analyse your repo
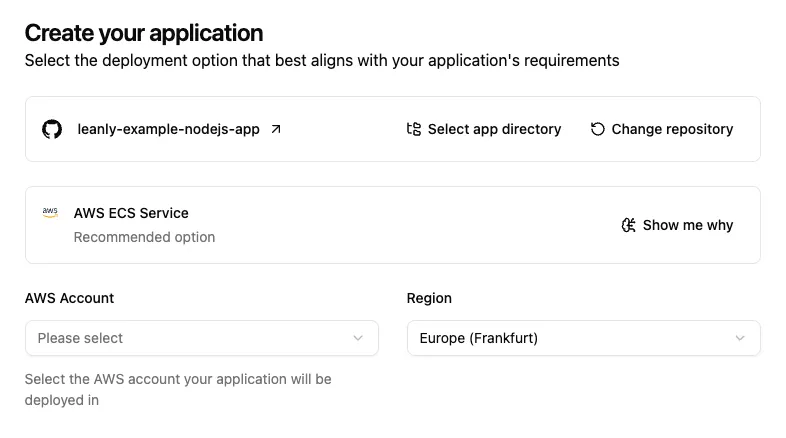
We analyse your repository and determine what it needs to deploy — the right AWS services, sensible defaults, no input from you. Render web services are containerised, so ECS on Fargate is the most common recommendation — but we may suggest something different depending on your workload's scaling, cost profile, or region requirements. You see exactly what's being created before anything executes.
Step 4 — Select your deployment target
If you have multiple cloud accounts connected, we'll show recommendations across all of them. For this migration, select your AWS account. If we've suggested options across clouds, pick the ECS recommendation to stay on AWS — or choose whichever fits your requirements best.
Step 5 — Add your environment variables and confirm
We show you what we recommend deploying before anything is created. Review the proposal, add the environment variables you exported in step 1, then hit Confirm deployment.
Tip: You can drag and drop a
.envfile directly onto the environment variables section to import them in bulk.
We build and provision everything in your account. For a stateless web service, most deploys are live within a single session.
Step 6 — Smoke test the new deployment
Hit the endpoint we give you. Run through your critical paths — auth flows, API responses, anything your app does in production. Keep Render running in parallel until you're confident.
Step 7 — Cut over DNS
Update your DNS records to point to the new endpoint from the Leanly deploy output.
Allow up to 48 hours for full propagation, though most resolvers update within minutes. Render and Leanly can run in parallel during this window.
Step 8 — Decommission Render
Once DNS has propagated and you've verified traffic is routing correctly, delete your Render services. Render continues billing until you do.
What's different now
Billing goes from Render to your AWS account directly. Your compute costs appear in AWS Cost Explorer — no PaaS markup, no Render invoice. We charge separately for orchestration (see pricing), but the compute bill is yours.
Visibility is real now. Open CloudWatch and you'll see actual logs, metrics, and alarms. Open the AWS console and you'll see the exact resources running. Nothing is hidden behind a vendor dashboard.
Pushing new versions works the same way as before: push to your main branch, we build and deploy automatically via the GitHub integration.
Common gotchas
Render Postgres managed databases. Render injects the connection string for its managed Postgres automatically — outside Render, that string is meaningless. Before migrating, set up an external database (AWS RDS, Supabase, Neon, or similar) and replace the Render-managed connection string with a real one.
Render environment groups. If you've been using Render's Environment Groups to share variables across services, export each service's resolved variables individually — the group references don't mean anything outside Render.
If you're still weighing the move, see how Leanly compares to Render.